
Pistol Suppressor
– Piston Not Lubricated – Your piston has to be lubricated in order for your pistol suppressor to cycle properly and not cause end cap strikes. We recommend using white lithium grease. Place enough to lightly cover the piston as shown in the photo below.
– O-Rings – At times pistol barrels will come with O-Rings on the threads near the shoulder of the barrel. These are typically used to prevent the thread protector from walking off. It causes misalignment of the suppressor, leading to front cap or baffle strike.
–Not Correctly Attached to 3 Lug Mount – When attaching a suppressor onto a 3 lug mount, always make sure it’s done properly. If the suppressor does not click up into the proper lug, it can come loose and while firing. You can test this by seeing if the suppressor twists or pulls off the 3 Lug Attachment. If it does, reattach it. When attached properly, you should notice it pop up into position and it won’t be able to twist or be pulled off. Our 3 Lug Attachments have a visual Go/No Go Gauge in order to show when the suppressor is properly attached. Check out this video on how to install your 3 Lug Mount.
Rifle Suppressor
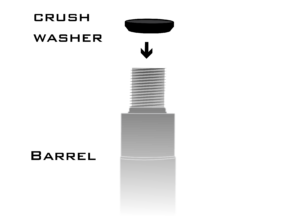
– Crush Washers – Crush washers are in between the barrel’s shoulder and the muzzle device that comes standard with your rifle. Not all rifles come with them, but a majority do. A crush washer prevents a suppressor from being able to sit flush on the barrel shoulder, which can throw off the alignment. Having a suppressor attached to a rifle with a crush washer is one of the most common reasons we see end cap strikes. Do not use crush washers with Rugged Suppressors, they are not needed.
-Properly Attached Suppressor – Making sure your suppressor is properly secured will prevent multiple issues – including front cap strikes. Rugged Suppressors come with a Go/No Go Gauge in order to visually see that the suppressor is properly attached. For more information on our Dual Taper Locking Mounts and Go/No Go Gauge, click here.